Stampin’ Up! Regionals–Vancouver

I spent a whirlwind day at the Stampin’ Up! Regionals in Vancouver, along with 300 other keen Stampin’ Up! demonstrators.  It was an incredibly rejuvenating experience, getting me all excited about their products again, not that it took much.  They have such good quality products.

We got to work on make and take projects throughout the day.  Above are a couple that i actually finished.  Aren’t they cute?  Everything was using the same stamp set. 

Here’s a glimpse of our group’s crafting table.  We have our priorities straight: chocolate.  Lots of it.

053

I didn’t participate in the card swaps, but some lovely ladies still gave me their crafted items.  Check them out:

Everyone’s so talented.  There’s also a picture of me with Shelly Gardner (S.U! founder), floating around somewhere.  Of course it’s on someone else’s camera, so I may never see it ;-)

Check out the cool banner we made!  It was pretty easy to make and is stunning – in my opinion.  I’ve stuck it up in my craft room.

Doesn’t that just make you want to go forth and create? 

My brain’s still buzzing from all the creativity.  It’s a neat experience being immersed in an experience where everyone around you is coming up with new ideas, and so much cuteness.  You’ll have to come to a class to see a cute little project a friend gave out.  I’ve got an upcoming class on Sunday March 6th – 2pm where we’ll be making a set of 6 cards for all different occasions.  I can’t wait to show off more exciting things from Regionals!

Shauna
Posted in Uncategorized | 2 Comments

Love Notes and a Date Night Meal

IMG_0341

I woke up the other morning, did my usual morning thing.. and I’ll be honest, I’m not exactly a speedy, 10-minute morning person.  It takes me a good hour to shower, dress, get breakfast, pretty up a bit, get my coffee.  Í love my coffee.  Can’t go far without it.

193

Anyways, as I was about to leave I collected my notes and on my little list for the day were two of the cutest little “love” sticky notes.  Nathan had looked at his pink notes and thought to leave me hearty messages.  Since he doesn’t do cheesy-cute stuff like this very often, it felt pretty great!

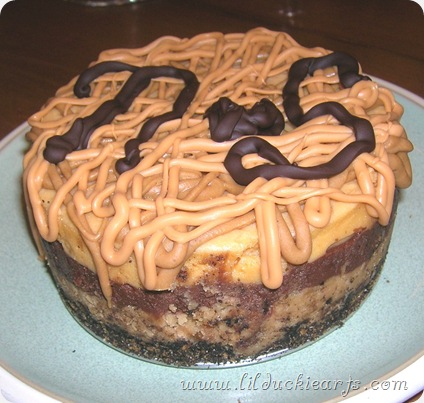
For a fun date-night dinner I made the most delicious healthy pizza and a totally unhealthy triple layer cheesecake filled and covered with mounds of chocolate.  Dark chocolate, butterscotch chips, and peanut butter chocolate chips.  Oh my.  I want more already.  That’s probably why “workout” is on my note above.  I seriously wanted to just pull off the top layer of hard chocolate and eat it all.

Healthy Pulled Beef Pizza

2 small light tortillas (about 80cal each)
1/2 cup pulled beef or: pork, or shredded chicken mixed with 2T bbq sauce
3/4 cup caramelized onions, mushrooms, black beans, roasted veggies.. any mixture will be great!
2 handfuls chopped fresh spinach
20g light mozzarella cheese, shredded
chopped fresh cilantro

Preheat oven to 425F
Lay the tortillas on a baking sheet, then layer half of the pulled beef, veggies, spinach, then cheese on each tortilla.
Bake for 5-10 minutes, until golden.  Watch that it doesn’t burn.
Pull the pizzas out, top with cilantro, slice, and serve.


Triple Layer Cheesecake
Adapted from Surly Kitchen
Makes one 4 1/2 inch cheesecake

crust:
¾ cups Oreo Cookie Crumbs
1 T butter, melted
1/8 t cinnamon
filling:
1 pkg (8oz) cream cheese
¼ c sugar
2 T yogurt
1 T flour
¼ t vanilla
1 egg
1/3 cup peanut butter chips
1/3 cup dark chocolate chips
1/3 cup + 2T butterscotch chocolate chips, divided

for the crust:
Preheat the oven to 350 F.
Grease the bottom and sides of a 4 ½ inch springform pan. Combine ingredients, pat into prepared pan with the back of a spoon. Bake 7-10 minutes.
for the cheesecake:
Reduce the oven to 300F
Beat the cream cheese and sugar until creamy. Then mix in the yogurt, flour, and vanilla. Beat in the egg to combine.
Set aside.
Melt the peanut butter chips in a bowl, in 3o second intervals until melted, stirring in between.   Scoop 1/3 of the cream cheese mixture into the melted chips then pour the peanut butter chip and cream cheese mixture into the crust.  Smooth over it with a spatula to make it nice and even. Repeat the melting, mixing, and pouring steps with the dark chocolate, then with the butterscotch chocolate chips.
Bake 35-45 minutes, until the top is golden, the edges are set and the center jiggles a bit. Remove to wire rack to cool 10 minutes. Run a sharp knife around edge of pan, allow to set for 1 hour. Remove from springform pan to a serving dish.
Add 2 T of each chip into its own snack sized Ziploc bag. Seal the bags and microwave 20-30 sec, and massage bag to ensure all chips are melted. Once melted, snip a small hole in the corner of one bag and drizzle over the cheesecake. Repeat for the remaining two bags of melted chips.  Try not to squeeze it straight into your mouth. Refrigerate until serving.

Make this. Your tummy will thank me.

Shauna
Posted in Recipe | Tagged , | Comments Off on Love Notes and a Date Night Meal

Presents of Love

Who doesn’t like to receive homemade freshly baked goodies?  I wanted to do something special for my friends to make them feel loved, so I baked a few batches and decided I’d package them up and deliver them, door-to-door style.  I chose the recipes based on how much they pushed my cravings buttons, and on how many eggs I had.

There were the Cherry White Chocolate Oatmeal cookies from My Madison Bistro.  These turned out to be so flavourful, chewy and tender.  Yum.  I often don’t like my own baking with white chocolate in it.  It’s better when someone else makes it, you know?  like white chocolate macadamia nut cookies.. oh my.  Regardless, these were delicious!

The next batch was World Peace Cookies that I got from Dinner With Julie. They’re a double chocolate cookie full of chewy yet crispy amazingness.  She’s got a double batch there, and you can freeze the dough to cut and bake at your leisure in the future.. or hey, bake them all now.  Eat a gabazillion cookies!  I promise not to tell.  They’re crisp and chocolaty and gooey all at once, with a tinge of delectable saltiness.  You could freeze a log of them and chop off a couple to bake and enjoy while watching The Bachelor.. not that I do that…

Anyways, I packaged these up and took them to friends.  I snuck them in mail boxes and ran away.  The sweet and appreciative emails afterwards were reward enough.  It felt so good to have brought some ooey gooey cheer to my peeps.

I had some World Peace cookie dough left over, so I chopped some off today, popped it in the oven, and included it along with a birthday present for my closest friend.  Her gift was ice cream themed, and I figured that chocolate cookies go well with anything, especially ice cream.  And coffee.  Maybe she’ll make some espresso ice cream…

Posted in Recipe | Tagged | 1 Comment

Simple Valentine

Happy hearts day.  I know that not everyone likes to celebrate it.. but hey, isn’t it just a good day to show your friendship, too?  It doesn’t have to be about whether you’re single or not.  I love my friends, and I want them to know it.

This was the last card for my valentine’s class.  It was the class favourite because of the simplicity, the clean lines, and how easy it was to make – especially since I had all the papers pre-cut.  Stamp the main image, use markers for the love image, and add a jewel. Round the corners, glue together, and you’re done.

To recap, here’s the class set:

Have a great day, and use the opportunity to tell someone that you care.  <3

Shauna
Posted in love, Valentines | Tagged , , , | Comments Off on Simple Valentine

Clipped on Love

Another little Valentine’s themed set for you today.  This was definitely the most complicated of the cards in my Valentine’s class… we had to cut things out – say what?!  Stamp, cut, punch, stamp some more, and tie a wee bow.  The ladies chose to skip the bow because it was difficult to tie it so small.

I agree.  I thought I was going to get a finger cramp tying that thing!  It’s pretty darn cute, though.  I’m also a fan of different colour combinations with this kraft paper.  It goes well with the green, don’t you think?

And here’s the little matchbox to go with it.  I feel like I should give this to Nathan and tell him to fill it with delicious things for me. hehe..

Shauna
Posted in love, Valentines | Tagged , , | Comments Off on Clipped on Love

A Wee Valentines Class

Tomorrow’s another work day.  I was mightily tempted to turn down the request to fill in for a teacher tomorrow, but it was a teacher that I love subbing for, and it was high school.  I’ve been in more than my fair share of middle school classes these last 3 weeks, and I needed a high school interlude!

Valentine’s Day is coming up.  Do you think anyone hands out valentines cards to friends/sweethearts on Valentine’s Day in high school?  Hmm.  No matter.  I had a Valentine’s Cards class the other night, so my two attendees will hopefully be handing out their creations.

It was sort of what I’d call a “project class.” We made 3 cards, each with little matching matchboxes for treats.  They’re about 1.5 – 2 times the size of a regular little match box, and do a great job at holding cinnamon hearts.

This first set is following that square card style that I used for my maternity cards recently.  I still thought it was cute!  And of course, my Big Shot came in handy for the match boxes.

The next card’s coming up soon!  In the meantime I’ve got to roast a chicken.  They say it’s super simple, so I’ll have to let you know how it goes.

Shauna
Posted in Valentines | Tagged , | 2 Comments

Roots and Quinoa Hash with a Poached Egg

This week crafting has fallen off my radar.  I feel like I’ve been going non stop at full tilt, so something had to give.  What with working every day, cramming in (well, they don’t cram, really) hour-and-a-half long workouts, ultimate games, and cooking dinner.. there just isn’t time left in the day.  But check out a delicious recipe I made for us this week.

I adapted a recipe from Whole Living, which worked beautifully.  This was my first ever attempt at poaching eggs in water, and I’m pretty happy with how they turned out, and the step-by-step instructions below were super helpful to a newbie like me.  That poached egg, by the way.. so delicious.  I want one on toast right now.  I wish I could conjure things like that up, without having to pause while I attempt to read the entire internet.

You could make this with any combination of roasted root veggies, not just yams and beets.  Parsnips would be delicious, as would carrots, or a big ol’ mixture of whatever you fancy. 

Roots and Quinoa Hash with a Poached Egg
Serves 4

Ingredients

1 large sweet potato or yam, cut into 1/2-inch cubes
2 1/2 t olive oil
coarse salt (like Kosher or sea salt) and ground pepper
2-3 beets, peeled and cute into 1/2-inch cubes
4 large leaves Swiss Chard, chopped (or use the beet greens, kale, or other greens)
1T white-wine vinegar (or other vinegar, optional)
4 large eggs
1 leek, white and pale-green parts only, halved lengthwise and cut to 1/4-inch thick
1 cup cooked quinoa
3/4 t chopped fresh thyme

Directions

Preheat oven to 400 degrees. Toss the sweet potato with 1/2 teaspoon oil and 1/4 teaspoon salt.  Spread in an even layer on half of a rimmed baking sheet. Toss beets with 1/2 teaspoon oil and 1/8 teaspoon salt; spread on other half of sheet (so that beets don’t discolor potatoes, if you care about this.. To save time, I just did them all together). Roast, stirring halfway through, until tender, 35 to 45 minutes.

Meanwhile, bring a large pot of water to a boil; add vinegar (optional). Break each egg into a teacup. Reduce heat so that water is just simmering. Slightly immerse 1 teacup, and gently slide egg into water. Use a spoon to fold edges of white over egg. Repeat with remaining eggs. Simmer until whites are just set but yolks are runny, 2 to 3 minutes. Transfer eggs to a towel using a slotted spoon, and drain.

Thinly slice chard or other greens. Heat 1 1/2 teaspoons oil in a large nonstick skillet over medium heat. Add greens, leek, 1/4 teaspoon salt, and 1/4 teaspoon pepper; cook until tender and lightly browned, 8 to 10 minutes. Stir in quinoa, thyme, and vegetables; press down using a rubber spatula. Cook until quinoa is warm, 1 to 2 minutes. Divide among 4 plates; top each with 1 egg, and season with a pinch of pepper.

Shauna
Posted in Recipe | Tagged , | 3 Comments

Updated Set of Butterfly Cards

A friend of mine who lives in Australia is getting married next week.  Unfortunately, a trip down under wasn’t in the cards for us, especially not on 2 months’ notice.

I wanted to make her a gift from the heart that she could also use.  Not something that would sit there and clutter up her house.  We all have enough clutter.

I settled on a set of thank you cards that she could give, either for wedding thank yous, or whenever.  These are a bit of a spiffed up version of a similar set I made.

I changed the circle message shape to this funky one, and added the fun black lace.  It’s lace that I got originally for Halloween cards, but it seems to work well here too.

This purple one’s my favourite.  I thought about sending it in to try and get it published in a magazine.. but then I wouldn’t be able to share it with you (or include it in my gift).. I guess I could have made an extra one.  Oh wells!

This one’s fun too.  Yay for pretty Stampin’ Up Designer Series Papers!

I really hope she uses this gift and that someone else enjoys the thank you notes they receive :-)

Shauna
Posted in thank you | Tagged , , , , | Comments Off on Updated Set of Butterfly Cards

Congrats, baby

More on the theme of babies…

This little card is for an order for a friend who’s attending a baby shower.  Her sister in law recently had a beautiful little girl.

I followed the same style as the last maternity card, using different colours and different stamps, of course.  I’m a fan of this thin stitched ribbon by Amuse.  It’s so cute and comes in so many different colours.

Giant baby polka-dots!

Shauna
Posted in baby, congratulations | Tagged , , | Comments Off on Congrats, baby

Congrats, to the Expecting Ones

Hey there,

I have a few friends who are expecting babies in the next 4-6 months.  This is exciting to me because these will be the first “friend babies” that live close enough for me to visit more often than once or twice a year!  To celebrate, I crafted up a couple cards.

I thought the maternity dress was just too cute not to use, and the thin ribbon and tag added some more baby appeal.

The background paper is one that I picked up from Design House Digital and printed off on some white cardstock.  I darkened up the edges with some distress ink, and painted the dress in with my Twinkling H2Os. 

Did I mention that I recently bought a Big Shot?  Well, I got it a month or two ago, but just used it for the first time last week.  I got these CUTE little nestable (all different sizes) shapes.  What is that shape called – the one that looks like brackets on each side?  Regardless, it makes me happy.

Congrats to my lovely ladies and their husbands.  I can’t wait to meet your babies!

Shauna
Posted in baby | Tagged , | 3 Comments

A Calendar with Memories

Hiya, lovelies!

I was recently inspired by Caroline’s beautiful digital calendar kit to create a photo calendar of my own.  This was my very first digital scrapbooking style of project, so I learned a lot, but had lots of fun creating my calendar, too!

June Pictures copy

June Month copy

Unfortunately I haven’t been taking many pictures the last few years, so I didn’t have a lot to work with.  It’s a lot of effort rounding up pictures from all the friends who actually brought their cameras to events.

I got to play with layering of photos, frames, tags, writing, and lots more.  It’s endless what you can do with digital art and elements.  I printed the sheets out on 8 1/2 x 11” cardstock, then had it spiral bound at Staples.  Check out the binding:

And here it is, on my wall:

FUN!  See, I’m becoming calendar obsessed, apparently.

Cheers,

Shauna
Posted in craft | Tagged , , | Comments Off on A Calendar with Memories

A New Years’ Project

Happy New Years to you!

Nathan and I made a crazy decision last night.  Apparently we’re out of our minds.  We are choosing to take another crack at the P90X workouts.  In case you aren’t familiar with them, it’s 3 months of brutal hour-long (often much longer) workouts, 6 days a week.  Oh, but there’s more.  We’re also playing Ultimate twice a week, and I’m playing hockey.  Instead of being ultra crazy, we’ve decided to do bump the p90x workouts on those days, so the whole program will take us another few weeks.

As for crafting, a friend of mine made the cutest little project that I coveted.. soooooo I made one too!

It’s a perpetuating 365 journal calendar.  You write one or two little lines for each day.  The following year you do the same, and so-on.  It’s pretty neat because you get to look back on the years in a quick point form version.

I used 4 packs of index cards that measure 5” x 3.5”.

The box was a bit of a tricky part.. I had no boxes that were 5.25”x 3.5” so I had to improvise.  I lucked out and found an old box that used to hold 12 packs of gum (oh Costco, how I heart you).  I added some patterned cardstock, some ribbon, and a button. Ta-da!

For the month separaters I just glued a piece of cardstock to a piece of patterned paper.  They measure 5 x 5 1/2”.  Next, I stamped the months on them.

The tedious part? Stamping every single day on a card.  This took several hours, which meant I could catch up on Glee!  Luckily I had a date stamp from years ago.  Remember, you don’t want the year at the top of each card.  366 cards later (leap years!) and I’m done.  Pop them in your box and you’re good to go.

You might be asking why I have a January card at the front, with the February marker right up there with it.  I found that the most logical order for my calendar was to have the markers at the front of each month grouping.  This means that on January 1st, I moved the Jan. marker to the back.  So now the 1st, 2nd, and 3rd are all behind it at the back of the stack.

Now, go make one.  Quickly, before this month is over!

Shauna
Posted in craft | Tagged , | 1 Comment

Happy 2011!

Wishing you all the best in 2011!

167942_627252245536_122504823_36530842_4445944_n

Some projects to come soon! I promise!

Posted in Uncategorized | Comments Off on Happy 2011!

Super simple fancy card set

Hi there!  I’m having fun where it’s much warmer than at home.  Sunshine? yes please!

Today I thought I’d share a fairly quick gift idea with you.  I’ve done a mini version of these cards before (half the size, using smaller punches).  I picked up a new “punch anywhere” butterfly punch by Martha Stewart, and just had to put it to use.

You know how much I love the vintage book paper look, so I set to work punching holes all through my book.  Don’t worry, I bought it specially for this purpose.  I don’t think I could chop up a book I already owned and read. 

I used regular invitation sized cards, and cut out a piece of patterned paper for each one, measuring somewhere around 5 1/4” x 4”.

I cut out a 1 3/4” circle for each card, and 3 layers of butterflies from the book paper.  I edged EVERYTHING in a nice brushed corduroy distress ink. 

I sprayed the butterflies with some water, crumpled them up bit, and allowed them to dry.  This gave them some nice texture.  Next, I glued 3 layers together with a bit of double-sided tape down the centers.  I adhered a button and it all came together nicely.  They’re even cuter if you tie some string on the button and leave the ends long for “antennas.”

Some family member will soon be 6 cards richer.  Merry Christmas!

Shauna
Posted in birthday, thank you | Tagged , , , | 3 Comments

Mini Christmas Gift Box

Hi again,

Things are busy, busy, busy!  I’m trying to organize myself for the cruise we’re going on.  We leave Wednesday morning for Long Beach (Cali).  We’re spending a day at Universal Studios, followed by two days at Disneyland.  On Sunday we head to the cruise ships where we’ll be on a week-long cruise along the West coast of Mexico with Nathan’s extended family.  It’s going to be one fun trip, and I promise to share a few pictures.  I’ll even try to do some blog posts, but you know how that goes ;-)

Today I have for you a mini little Christmas gift box.  I love making these boxes, since they’re so cute and simple.  You start out with a piece of decorative paper or cardstock that is 6”x6”.

Score the paper at 2” and 4” so it folds up into a 2”x2”x2” box, and adhere together.  The bottom’s done!  You can either make the top pretty much the same, or follow the pattern I’ve made.  It’s got some extra folds in there. 

Add some embellishments.  I love doing my sentiment on a little banner like this (cut out tails).  Add a tag, ribbon, a button, and you’re done.  Glue dots work especially well for adhering all those things.  Now you need to fill your box with special goodies, of course.  And send some to me.  Especially if they’re chocolates.. yum!

Shauna
Posted in Christmas, craft | Tagged , , , , , | 1 Comment