What a Hoot

Ok, that title is cheesy.. but I’m leaving it.  I got this lovely own stamp at a stamping retreat about a year ago, and this is the first time I’ve used him. I’m pretty fond of the brown and green combination, and the mix of simplicity with details like that ribbon-ey twine stuff.. is there a better word for it?

owl and fish0001

Nothing fancy here.. the tag punch is a Martha product.. the two stamped images are in VersaFine Vintage Sepia.

And the story behind my most recent card-making times? Well, my cousin-in-law had given me a curling iron for Christmas.  Said iron ended up not working, and the store was all out of that model.. sooo she paid the difference to upgrade. So nice. I wanted to do something nice in return, so I’m trying to get together a little set of cards to give to her.. Everyone likes cards, hopefully? Yes?  I don’t know.  Not everyone gives cards, and some people really enjoy scoping out the card aisle to find the one with the most hilariously perfect message.  Oh well, some hand-made ones will hopefully be appreciated.

Posted in Any Occasion, guys, Thinking of you | Tagged , | Comments Off on What a Hoot

Fishy Goodness

I spent hours playing around with cards and ideas.  I had some pre-scored cards by Amuse that I wanted to use up. Well, it didn’t go so well.  I ended up throwing out 3 cards.. ugh.. they were just so hideous!  You can’t see them because they hit the recycling bin and away they went.

Here’s the first “good” one that came of my day of failed craftiness.. well, I guess it wasn’t a total failure after all.

fish0001

I like the colours, and I was searching for a way to use a Martha Stewart punch that I recently acquired.  We can pretend that the white strip it made is bubbles! or.. water!

So as per my usual, the fish is painted with Twinkling H2Os to get a nice touch of shimmer.  “best fishes” is by Amuse and the fish/hat combo are from a clear set by Stampendous.

Posted in birthday | Tagged , | Comments Off on Fishy Goodness

I used a drill!

Guys, guys, be proud, guys!  I used a drill and made my craft room a tiny bit more functional.  Well, ok, I didn’t even get to use the thing.  Normally I’m the power tools gal.  I grew up being the only girl in shop class, with some woodworking tools of my own at home. Hubby here hadn’t done any of those things of his own accord, yet he’s used our new drill a whole lot more than me. (A whole lot more than never is pretty easy to do)  I was having a hard time with the level on it, so I got some help.  But really, the rest was up to me….

I screwed in some drywall screws and hung this lovely file organizer that I am now using to display my cardstock.  I like to think that if things are out in the open where I can see them, I’ll be more easily inspired to create.


Maybe when I have my own house I can install all kinds of shelves to display my stamps, ribbons and other such fun things.  But for now, this is probably enough holes to patch when we move out!

Posted in Uncategorized | Tagged | Comments Off on I used a drill!

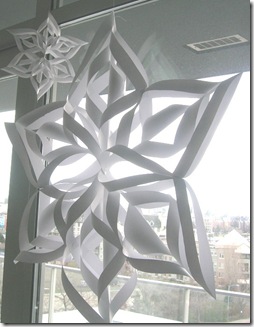
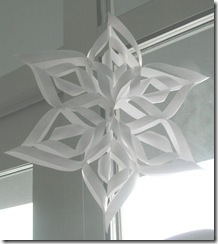
Pretty window adornments

Alright, so it’s January and I have yet to take down my Christmas tree or any of my random assortment of decorations.. but Christmas is just so pretty.  How can I take it away?  I told the boy that if he wants the tree down, it’s up to him to do it because I’m just too happy leaving it up forever.

Well, one of said decorations is some paper 3D snowflakes that I made.  I originally got the idea from a friend a few years back, but when I couldn’t remember how to make the things, I found some great instructions here at WikiHow. Take a look!


Some tips…

I did an extra fold so that I could do all the cuts at once.. a bit quicker!  The bit one is made from 12”x12” paper, and the little one is 8 1/2” x 8 1/2”

Posted in Christmas, craft | Tagged | Comments Off on Pretty window adornments

New Years Tidying

Happy 2010!  This new year and the chaos of the busy holidays has brought with it a very strong need to tidy everything in an attempt at organizing my life.  During one of these little missions (seriously, I lose steam after about 10 minutes!), I found some Christmas cards that I had yet to post about.

These cards I made at the stamping retreat with the lovely ladies of Lasting Impression Stamps. Credit’s fully due to them, although I did cut out the cardstock for about 20 of each of these cards!

xmastreesglitter xmasbirds xmaspenguin

Aren’t these ladies talented?  The row of trees are stamped in a glue pad with glitter applied. The little birdies are first stamped, coloured, and cut out. The lovely penguin is lightly coloured with pencil crayons.

I hope the new year brings me a clean house and plenty of crafting fun!

Posted in Christmas | Tagged , , , | Comments Off on New Years Tidying

Butterfly Bliss

DSCN4207

This stamp’s beauty captured me from the beginning.  The butterflies and overlapping textures… I think they pair perfectly with the fern-like pattern on the background paper.. and the little butterfly in the top right corner is… devine, non?

Materials

White and blue cardstock, and a matching pattern paper of choice
Inkadinkado butterfly set (clear)
VersaMark Ink
Detail White Embossing Powder
Detail Scissors
Embossing tool/Heat gun
Pop dots

How-to

  1. Cut out your papers to the right size.  Save a scrap of blue for the cut-out butterfly
  2. Stamp the main butterfly image on the patterned paper in VersaMark
  3. Sprinkle on the embossing powder and melt with your embossing tool
  4. Affix to blue background and then to white card
  5. stamp other butterfly image on blue cardstock and emboss in detail white
  6. cut out, bend, and attach to card using foam pop dots.
Posted in Any Occasion, birthday, thank you | Tagged , , | Comments Off on Butterfly Bliss

Colourful Balloons

birthday balloons

Need a bright and cheerful birthday card?  I think this one fits the bill, especially for the boys of this world.  I think I got those balloons as a dollar stamp from Michaels Craft store.  On that note, I really do need to avoid Michaels.  I can’t go in there without spending way more money than I had intended.. there are just too many fun things to see everywhere!

Materials

  • Cardstock cut to sizes
  • Clear Balloon stamp, candles stamp and birthday stamp
  • VersaFine Ink (Onyx Black)
  • VersaMark Ink
  • Watercolour Pencil Crayons
  • Pop dots
  • Clear StarDust pen
  • Paintbrush and water
  • Corner Punch

How-to

  1. Stamp balloons in VersaFine Ink
  2. Colour in with Watercolour pencil Crayons
  3. Blend pencil crayon with wet paintbrush and allow to dry
  4. Add a bit of glitter to the balloons with the StarDust pen
  5. Stamp candles on background with VersaMark ink
  6. Stamp ‘Happy Birthday’ in VersaFine Ink
  7. Cut corners of white cardstock and the middle piece that you’re laying behind it
  8. Stick everything together :-)
Posted in birthday, guys | Tagged , , | Comments Off on Colourful Balloons

Santa hat

xmas hat0001

Santa Clause is coming to town!  Well, it’s December and I just finished up my cards.. Although I have to write in most of them still!

I used a cherry red ink and some prisma glitter on the hat.  The candies are stamped onto circles (from a circle punch). Super simple, super quick!

Posted in Christmas | Tagged , , | Comments Off on Santa hat

Glittery Christmas Card Class

chimney santa penguin family ornament branch christmas bell

The other night I taught a class at my beloved stamp store.  These are the cards we made.. 2 of each in the 2 hours we had.  I can’t take credit for the designs, but my oh my are they ever cute (and simple!)  They were fun to make, and I think the ladies (my “students”) enjoyed making them too.

Santa Down the chimney has glitter glue for the snow, and the chimney is stamped on brown paper then cut out and added to the card.

The Penguin family are super cozy in their matching sweaters.  Their hats are done with Prisma Glitter, and the sweaters are stamped on different coloured cardstock and cut out.

The ornament branch card is staped in VersaFine ink, and the ornament comes just like that, by Hero Arts (jewel ornament).

And finally, the Christmas bell card is done in PearlEx powder, with a little star jewel (AMuse). 

It was fun teaching a class where I didn’t have to do any of the prep work.  I didn’t even have to cut the cardstock to size – it was already done for me!

Posted in Christmas | Tagged , , , , | 1 Comment

Christmas Tree

xmas tree0001

See what I mean about a ribbon thing happening here?  And isn’t it super cute?  I think so!  These little cards (the background one, I mean) are made by AMuse.  The ribbon I fell across at Michaels, and couldn’t control my impulse.  Oh, and the tree and message are both from there as well, from the $1.50 bin. Why oh why didn’t I choose this simple card to send out to everyone this year?  *stubborn* I’ll stick with what I have.. Now to get them made…

Some other “how-to” tips?  That red paper is by Basil, a shimmery beautiful shade.  The tree is in VersaFine, with the edges done in the same ink.  I added a touch of yellow glitter glue to the star.  The bow is just tied in a single knot and attached with a glue dot.

Posted in Christmas | Tagged , , | Comments Off on Christmas Tree

Christmas Balls

xmas balls0001

I got called in to work at the stamp store the other day, so I found a few minutes to put a card together.  This Brings me to what happens in Michaels Craft store.. Do you have the same problem as me?  You buy things? It just seems to happy. I’ll admit it, it’s a bit of a “problem,” but there were a whole bunch of fun Christmas clear stamp sets, all for $1.50.  I only bought the cute ones, I swear!

So yes, this card is made from one of the discount bin sets of stamps.  They’re not made very well, but they get the job done if you’re patient and use good inks.  Apparently I’m into bows now.  This is surprising to me because in all the years that I’ve been stamping, I have used maybe 2 bows total, and in the last few months I’ve used a gabazillion.

I just stamped these and painted in with Twinkling H2Os.   The ribbon is by AMuse, and the top of each ball is coloured in with a silver gel pen.

Posted in Christmas | Tagged , , | Comments Off on Christmas Balls

Mask-Making madness

DSCN4231

A friend of a friend was having a mask-making party, so 3 of us girls gathered up our crafting scraps and headed over to join the very large group.  There must have been 30 or more people coming and going.  This is my first ever attempt at making a mask.  I’ve learned that you need to think bigger and beyond the whole “mask” concept to get a real work of art.  Still, I’m pretty happy with mine.  It’ll be great for a Halloween costume!

I found it neat that people tended to make masks that suited their personalities.  They chose colours or themes that just seemed appropriate to them.  It was amazing seeing the different works of art around the room (I’m sad that I didn’t have my camera with me).  All in all, a fun and inspiring night!

My mask: The flowers are punched from scrapbook paper scraps and layered on.  The butterfly is from one of my stamps.  I embossed it in silver, added some glitter, and carefully cut it out.

Posted in Uncategorized | Tagged , , | 2 Comments

Flowery Wishes

Card to Grandma

I see glitter, punched out flowers, and a pretty little blend of blue inks.  I used this as a birthday card for one of my aunts.  It could easily be used for many other occasions.. probably not Halloween though ;-)   Much too flowery for that.

Materials

  • Cardstock cut to size
  • Flower stamp (Hero Arts)
  • Best Wishes stamp (Hero Arts)
  • Small flower punch
  • Patterned paper
  • Versacolor ink pads
  • Blue glitter glue

How-to

  1. Ink the flower stamp blending different colours of Versacolor inks (use the ink cubes) and stamp on white cardstock
  2. Stamp sentiment in turquoise ink
  3. Punch out 4 flower pieces from the patterned paper
  4. Adhere flowers to the card
  5. Add a little dallop of glitter glue to the centre of each flower and smoosh a bit.
Posted in Any Occasion, birthday, thank you, Thinking of you | Tagged , | Comments Off on Flowery Wishes

Cat Balloon

cat balloon

Interesting.. this scan dulled the green out a whoooole lot.  It’s a pretty darned bright green sitting here in front of me.  And that background liney stamp is really messing with me.  I’m a big fan of this little kitty “Fluffles.” I can use him in so many different cards for all different occasions. He likes to be cut out so he can jump through the air.

Materials

  • Cardstock cut to size
  • Fluffles stamp set
  • Happy Birthday stamp
  • VersaFine Ink (Onyx Black)
  • Twinkling H2Os and paintbrush
  • Corner Punch
  • Pop dots

How-to

Do some painting and some cutting out et voila :-)

Posted in birthday, guys | Tagged | Comments Off on Cat Balloon

Happy New Baby to You!

baby1

My cousin just had a healthy baby boy – Samuel.  Congratulations, Kerri and Justin!  At times like this, I wish the whole family lived all in the same city.  It’d make visits so much easier!  I don’t see myself going to Edmonton anytime soon, but you never know.  Maybe I’ll get sick of the mild temperatures and the rain here, and crave some freezing cold dry weather?  Anyways, isn’t this the cutest little teddy bear?  I thought it’d be neat to have him hanging, like from a mobile.. babies like mobiles.  I’ll have to make one when we have a baby.. err, hopefully I’ll make it before the baby comes.  No no, not pregnant yet!

Materials

  • Cardstock and patterned paper cut to size
  • Teddy bear stamp (Judikins?) and rock-a-bye stamp
  • Punches: Circle punch, corner rounder, and Martha Stewart border
  • VersaFine Onyx
  • Sparkly ribbon
  • Foam dots
  • Baby Blue ink pad
  • Water color pencil crayons and water + paintbrush
  • 1/8” hole punch

How-to

  1. Cut papers to size.  Punch out 3 circles in white, use corner rounder for 2 diagonally opposite edges of patterned paper, and use Martha punch for the light blue piece (round one corner of it too)
  2. Stamp teddy bears and sentiment in Onyx
  3. Colour in teddy bears with water color pencil crayons, and blend with wet paintbrush
  4. Punch holes in circles to make tags
  5. Edge tags, patterned paper, and top light blue border in baby blue ink
  6. Tie ribbon to tags, and attach to border piece of cardstock
  7. stick everything together – attach tags to card with foam dots.
Posted in baby | Tagged , , , | Comments Off on Happy New Baby to You!