Birthday Candles

birthday candles blue birthday candles red

I’m always on the lookout for cards that I can give to guys.  Birthdays are definitely no exception!  Keeping a fairly neutral theme (candles!) seems to work, especially if I avoid using pink and purple, or any swirly flowers.  So today I was playing with my VersaMark ink pad (so useful!) and chalks.  It’s quick, easy, and looks pretty neat.  The biggest task is cutting out the cardstock and sticking everything together.

Materials

  • Coloured Cardstock cut to size
  • Candles stamp (Inkadinkado) and birthday stamp
  • VersaMark Ink
  • VersaFine Ink (Onyx Black)
  • Coloured chalks and a stiff paintbrush
  • Craft fixative spray (or aerosol hairspray – not so “memory safe”)
  • 2 way glue pen
  • Prisma Glitter

How-to

  1. Stamp the candles on white cardstock with VersaMark ink.
  2. While the ink’s still wet, brush coloured chalks over the image.  The stiff brush works well here to pick up chalk powder.  I like to use a brush meant for acrylic paint.
  3. Spray lightly with the craft fixative and allow to dry.
  4. Stamp the birthday sentiment in Versafine Ink
  5. Glue everything together
  6. Brush some lines of glue on the candle flames with the 2-way pen, and sprinkle on a bit of Prisma Glitter.
Posted in birthday, guys | Tagged , , | Comments Off on Birthday Candles

Hallowe’en time

halloween crows0001

Well, I love celebrations that can bring groups of people together to have fun.. and Hallowe’en does that.  I’m not one for putting hours into a costume because I end up getting frustrated.  Creativity happens in my head, I just can’t usually pull it off, or am not willing to put in the effort to make it work.  But I thought it’d be nice to have at least one card to celebrate the holiday.  I love crows.. they’re just so intelligent, and the upside down tree stamp made for some good swirls. 

What are you doing for Hallowe’en this year?

Materials

  • Black, purple, and light green cardstock
  • Black ribbon with bends in it
  • VersaFine onyx black
  • Crow stamp (Penny Black?)
  • Tree stamp…
  • Alphabet set.. by Hero Arts?
  • Clear stardust pen

How-to

  1. Stamp crows and tree on green cardstock in black ink (tree is stamped upside down around the edges – clever, eh?)
  2. Add sentiment using alphabet stamps
  3. Edge around the cardstock with black ink, adding a bit of shadow here and there
  4. Add some glitter to the moon and one of the crows
  5. Tie on the black ribbon
  6. attach cardstock together using double sided tape
Posted in halloween | Tagged , | Comments Off on Hallowe’en time

Happy Bar-a-mification!

gradCardLaura

To my dear friend Laura, Happy bar passing to you! This card I made for my soon-to-be lawyer friend because she’s oh-so special.  My husband took a look at it and wondered what it would look like with a slightly different layout.. Let’s ponder this… what do YOU think?

gradCardLaura1 gradCardLaura2 gradCardLaura3

Woah, card overkill! Well, the rounded corner edge would have to change, but I think the other layouts would work. He thought I should have the patterned paper part on the right hand side so that the card could be used horizontally instead (if used horizontally, it looks far better with the brown at the bottom). Oh husband, you’re so clever.  I still prefer my original though!

Materials

  • Brown cardstock
  • Beautiful patterned paper
  • Martha Stewart edging paper punch (so cool!)
  • Paper flowers (red and green)
  • 2 yellow brads
  • 3 gold jewels
  • Corner rounding punch

How-to

  1. Cut cardstock and paper to the right sizes. Estimate, mate.
  2. Trim the bottom of the patterned paper using the Martha punch, then trim the piece to the right length
  3. Attach flowers to paper using brads (I pierced the paper first to make it easier)
  4. Stick on your jewels
  5. Glue down patterned sheet to cardstock.
  6. Use corner punch  on bottom right corner. Purdy.
Posted in Any Occasion, thank you, Thinking of you | Tagged , , | Comments Off on Happy Bar-a-mification!

The State of My Craft Room

MessyCraftRoom

This is the messy desk in my craft room.. Why messy?  I’d say it means that I’m inspired but missing some focus.  I have all of these ideas in my head that I want to work on, but I also want to make a bunch of each cute card I design.  There just aren’t enough hours in the day to do both (and eat healthy, go to the gym, watch Survivor, etc.)

Posted in Uncategorized | Comments Off on The State of My Craft Room

Peaceful Wedding flowers

weddingFlowers

Some very good friends of mine are getting married on one of Vancouver Island’s most beautiful beaches. Congratulations to Margaret and Tyler!  This is the card I made for them.. I started with the colours, as I found the greens to be Margaret-esque.. from there, the stamps and the pieces for the design just sort of came together.  I even restrained myself from using glitter!

Materials

Cardstock and patterned paper
Stamps lalala.. the flower at the top is an Inkadinkado clear stamp, the asian ornamental cherry blossom is by JudiKins, and ‘love’ is by AMuse
VersaMark ink pad
Detail White embossing powder, and a heat gun
Dark Green eyelet and setting tools
Circle Punch

How-to

  1. Cut out your papers. Cut a dark turquoise piece with the circle punch
  2. Stamp cherry blossom branch with VersaMark and emboss with detail white
  3. Stamp and emboss flower on patterned paper, and cut out
  4. Add eyelet to centre of flower
  5. Stamp ‘Love’ on corner of card
  6. Glue pieces together and to the card
Posted in Uncategorized | 2 Comments

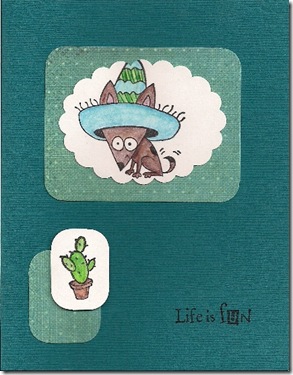
Happy day, gramps!

sombrero birthday

My grandpa’s turning 87, so I wanted to send him a fun card to celebrate the long life he’s had so far.  This little Chihuahua  is definitely up for a fun time, just like my dear grandpa hopefully still is!

Materials

Cardstock and patterned paper
VersaFine Onyx Black
Oval Scalloped Punch
Corner rounding punch
Chihuahua stamp set
Hero Arts Life is Fun stamp
Water Colour Pencil Crayons
Water and a paintbrush

How-to

  1. Cut cardstock to the sizes you want.  Round corners with corner punch, and punch out oval scallop
  2. Stamp Chihuahua and cactus on the white pieces
  3. Colour in using water colour pencil crayons, and blend with water and paintbrush
  4. Stamp “Life is Fun” in onyx black
  5. Glue it all together.  Use foam dots to pop cactus out.
Posted in birthday | Tagged , , | Comments Off on Happy day, gramps!

Dabbling in Tags

tags first

I decided the other day that I could play with some tag ideas.. These ones aren’t the most amazing in the world, but at least they got me going.  I think I’ll make a million more!  Everyone needs tags :-)

Materials

Pretty paper (cardstock thickness)
Pretty stamps (I’ve used Versamark Onyx black ink)
Ribbon or hemp rope
1/8” hole punch
Circle punch or scallop punch or tag punch.. any kind of punch!

How-to

  1. Punch out the shapes you want in your pretty patterned paper
  2. Embellish a bit, like by stamping swirls in black or adding glitter
  3. Punch your hole at the top of the tag
  4. Add your ribbon or string
  5. Give those gifts!
Posted in Uncategorized | Comments Off on Dabbling in Tags

Canada Thistle in the Sunset

scan0002

I was thumbing through some scraps of pretty papers and couldn’t resist.. I’ve also really wanted to use this thistle stamp.  I’ve had it for months and never even stamped it to test it out.  I like how there’s writing on the paper, and writing on the stamp that’s different enough to still work.

Materials

Your favourite beautiful patterned paper (you don’t want white in the paper, or anything too busy.. and darker shades work best)
Brown Cardstock
White cardstock
VersaMark ink
Detail White embossing powder and heat gun
Clear thistle stamp by Magenta

How-to

  1. Cut all the papers to the right sizes
  2. Stamp the thistle in VersaMark ink
  3. Add embossing powder and melt with heat gun
  4. Glue it all together
Posted in Any Occasion, birthday, thank you, Thinking of you | Tagged , , , | Comments Off on Canada Thistle in the Sunset

Porcupine (or Guinea pig?) love

AnimalLove

I have to admit that I didn’t come up with the concept for this card on my own.  I had a little help from my friends at the local stamp store.  I hope they don’t mind when I feed off their creative energy.. I did spend a good 6+ years working there!  Anyways, I didn’t steal everything from the original.  I used purple instead of light blue, went for a different image, and opted out of some brads, cuz hey, I’ve got to make it my own somehow.  As for the cute critters, I’ve had that set for quite some time.  I think it was a birthday present.  But is that a porcupine, or a guinea pig?  Beats me!  Thoughts?

I think it’s a pretty cute card for a lot of different occasions.  You can give it to a friend as a “just saying hi” or “thinking of you” type of thing, or birthdays, thank yous, you name it.

Materials

Brown, purple, and white cardstock
Brown ribbon by Amuse
Critters clear stamp set by Hero Arts
Pop dot
Water color pencil crayons
Paintbrush and water (I like to use the brushes with the chamber for water, so I don’t have to have a dangerous spilly cup next to me)
Memories Artprint Brown ink
Diamond glaze

How-to

  1. Cut out your cardstocks to the right sizes.. Approximate, it eases some stress of getting it “perfect” since there isn’t a perfect.
  2. Stamp the little porcupine pig guy in artprint brown
  3. Stamp the butterfly on a scrap of white cardstock in artprint brown
  4. Colour in both images with water colour pencil crayons (dry – don’t wet anything yet).  Shade a bit, or blend colours.. don’t worry, they’ll blend a lot more when you add the water.
  5. Carefully blend the colours together (light to dark) with a wet paintbrush.  Don’t make the paper too wet or it will warp or start to melt away
  6. Cut out butterfly and attach to piece with porcupine guy, using a pop dot
  7. stick your other cardstock pieces down on the brown background card
  8. Cut a length of ribbon to about 3 or 4 inches and tie a double knot
  9. Trim the ribbon until you’re happy with the length (trim on an angle), then attach to card using your favourite adhesive.  I like to use Diamond Glaze for extra sticking power.
Posted in Any Occasion, birthday, thank you, Thinking of you | Tagged , , , , , , | 2 Comments

Visiting the Craft Room

DSCN4212

This is my (somewhat) tidy desk.  I like to clean it up a bit after getting some fun projects finished. Let’s dissect…

  • My computer: my other hub of activity, the place where my blog posts are finished, where ideas float around and come my way (others’ fun blogs, stamping websites, etc).. oh, and of course, I always have some TV show playing in the background.  Right now it’s Being Erica.
  • Stuffed animals:  little duck and the lion sit there keeping me company while I play.  They’re just plain cute.
  • Baby wipes:  No babies here.. but the wipes clean stamps like a charm!
  • Cards:  Some that I’ve just finished

DSCN4216

My bookshelf.. with an alternate use ;-)  It’s pretty self-explanatory.. stamps, paper, more stamps, and more paper.  And in the drawer? Punches, stickers, extras of finished projects.. oh, and stuff for my beading habit.

Posted in Uncategorized | Tagged , , | Comments Off on Visiting the Craft Room

Birthday Cake Revamp

First Attempt
birthday cake first

Happy Saturday!
I got the inspiration for this card from some cute notepaper I had seen online (Don’t ask where, I can’t find it again for the life of me!).  It just didn’t turn out the way I’d wanted.. It started out with just a plain white background.. I added the message – still not good.  So then I added the swirl in fun new VersaMark Dazzle ink.  It didn’t show up very well and still looked like a very boring and blank card :(  What to do?  Well, I sort of fixed it going over the swirl in Prisma Glitter.. at least it looks a bit better!

Revamp Time!
birthday cake new

I was so unhappy with my first attempt at a “cute” birthday card that I just had to start all over again.  It’s like a breath of fresh air compared to the first one.. and unmistakably a “Shauna card.”  My thought process in the changes?  First, and most obvious, change was to get rid of all that unecessary white space.  It looks a whole lot better when the “blankness” is an inked up background colour rather than boring white!  Next, I wanted to add in my accent colour to help tie the card together with the image.  And you can’t tell from the scan, but there’s glitter in them swirls!

Materials

Stampendous clear cake stamp (from Fluffles set)
Twinkling H2Os
Yellow glitter glue
Foam pop dots
’Make a wish!’ by A Muse
Dot Flourish by  Inkadinkado
Versafine Onyx Black
VersaMark Dazzle – frost
Corner rounding punch

How-to

  1. Stamp the Dot Flourish on the background pink card in VersaMark Dazzle – Frost.. yay sparklyyyyy…
  2. Stamp ‘Make a wish!’ in Versafine Onyx Black
  3. Stamp birthday cake on white cardstock in onyx black
  4. Paint in cake with Twinkling H2Os and cut out
  5. Cut out blue and white cardstock and round the corners with your corner punch
  6. Mount the cake using pop dots
  7. Add a wee touch of yellow glitter glue to the candles and the dot on the i in ‘wish’
Posted in birthday | Tagged , , | 1 Comment

Blue Mini Thank you


Little thank you card

I love love love this card.  I’m a big fan of how it took me 5 minutes yet looks elegant – and maybe even modern?  It’s a perfect little thank you card for any occasion, whether someone was the best maid of honour ever, or she invited you over for a wine and cheese party.  This card makes me want to run into my craft room and make 20 different variations (and 20 more of each one)!

Materials

Cardstock – white and turquoise
Hero Arts Thank you stamp (says ‘Thank you very much’
Hero arts Asian set (flowers)
Versafine Black Ink
Momentos blue ink

How-to

  1. Cut out cardstock.  White is 3 x 4 inches, blue is slightly smaller. Fold white.
  2. Stamp Images
  3. Glue to white card
  4. That’s it. 
  5. No, really, you’re done!
Posted in Uncategorized | Tagged , , , , , | 1 Comment

Tile Coasters of prettiness


coastertop  coasterside

I love love love these!  I know they’re not cards, or any kind of paper craft, but I just couldn’t contain my excitement.  I had to show you!  It’s amazing to make them and watch the colours come to life as they swim across the tile – especially when you blend in the metallic bits, then watch it soak into textured layers.. and the stamp at the end.. ooh la la!  I had fun getting my fingers covered in a nice layer of permanent ink.  It was worth it for these results.  They now sit proudly on my coffee table.  I’ll take orders if you need gifts for friends ;-) 

Materials

Rough tumbled marble tiles
Alcohol Inks (2 colours that would go well together)
Alcohol blending solution
Gold painty pen
Makeup sponges
StazOn Ink pad
Stamps of your choice
Mini felt furniture pads (1cm in diametre)
A clear finishing spray

How-to

  1. Dust off the tiles so they’re fairly clean
  2. Drip about 6 drops of each colour of alcohol ink, plus 6 more of the blending solution onto the flat end of a makeup sponge
  3. Daub away at your tile.  Keep on daubing. 
  4. Add more inks and blending solution if you need to
  5. Do a second or third coat
  6. Draw a few little squiggles of gold ink onto the tile
  7. Add *only* blending solution to your sponge and daub gently at the gold until you get some nice pools of it across the tile. You don’t want too much gold or your ink won’t show up when you stamp.
  8. Allow to dry, then stamp your images carefully in StazOn ink.
  9. Allow to dry again, then spray with your craft fixative or finishing spray
  10. Attach felt pads to each of the corners, and you have a beautiful hand-made coaster.
Posted in Any Occasion | Tagged , , , | Comments Off on Tile Coasters of prettiness

Mini Thanks Butterfly


ministripeythanks

This little guy is 2 1/4” x 2 3/4” – Perfect for a gift tag.  I can easily punch a hole in the top left corner, add some ribbon, and tie it to a bottle of wine.  Take it to a friend’s house and you have a personalized gift.  If you haven’t notice, I love simplicity, and this little guy is certainly simple!  My scallop punch and a giant stack of patterned paper inspired me for this one.

Materials

Large Oval Scallop Punch
Thanks and Butterfly stamps
Versafine black ink
White Cardstock
Patterned paper

How-to

  1. Cut white cardstock to 4 1/2” x 2 3/4” and fold
  2. Punch out scallop shape in patterned paper
  3. Stamp sentiment and butterfly
  4. Affix to tag
Posted in thank you | Tagged , , , , | Comments Off on Mini Thanks Butterfly

More of the Twirling Collection

 twirlybutterfly
twirlybee

These cards make me so happy.  They’re bright and cheerful, making me *almost* want to dance (I’ll get back to you when I’m a better dancer).  I absolutely love how versatile the swirl stamp is.  I can add any little critter I want and watch him soar.

Materials

Cardstock
Twirly stamp
Butterfly or Bumblebee stamps
Twinkling H2Os
Glitter Glue
Versafine Onyx Black Ink

How-to

  1. Cut out all your cardstock to the desired sizes (Base card is 4 1/4” x 5 1/2”when folded)
  2. Stamp twirly stamp in black ink
  3. Stamp critter of your choice in black ink
  4. pain in critter with Twinkling H2Os.  Get it niiiice and thick.  You might have to wet it and let it sit for a bit.
  5. Add some glitter if you like.  You can’t go wrong by adding it to the bumble bee’s wings.
  6. Glue it all together et voilà!
Posted in Any Occasion, birthday, thank you | Tagged , , , , , | Comments Off on More of the Twirling Collection